Tools for Metal Aircraft Construction
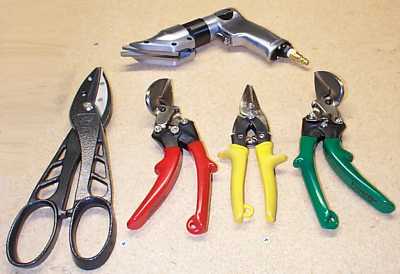
The CUT group. 12" andy snips, R, center, L aviation snips, air shear. Air shear makes a good edge, but I am not very accurate with it and only use it to take whole sheets into smaller sections. Andy snips make a very fine edge (almost ready to use). L & R snips have a fine serration to prevent pushing the part out of the cutters. Center snip has a rougher serration, leaving a rougher edge. 9/30/99.
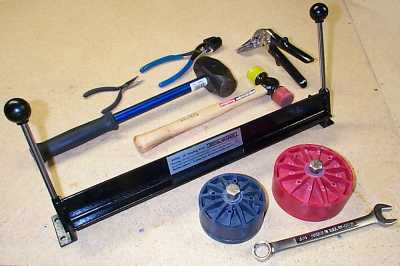
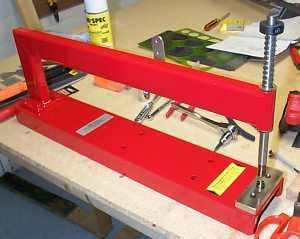
The FORM group. Needle nose pliers, fluting pliers, hand seamer, 4# hammer, rubber-face hammer, Harbor Freight 18" brake, 3" and 4" flange dies, 3/4" wrench for flange dies. Yes, a 4# hammer is the right tool for precision forming of 3/16" aluminum. The brake works well to .060". Other tools for .025-.032". 9/30/99.
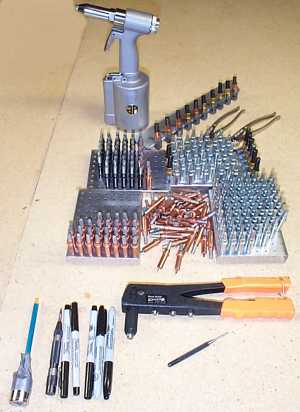
RIVETING and MARKING groups. Air rivet puller (with cut-down handle and stem catcher removed), cleco clamps, cleco pliers, clecoes, hand rivet puller, 1" dia. pencil (for drawing 1/2" flanges around rib form blocks), automatic center punch, sharpie pens, 3/32 punch (for rivet removal). (Also use back end of #30 drill for rivet head snapping.) 9/30/99.
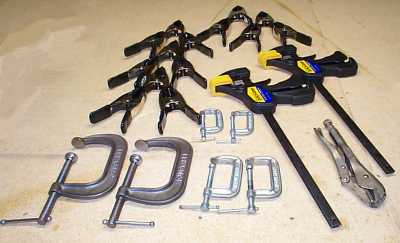
The CLAMP group. Spring clamps, bar clamps, C clamps, vise grips. Also use small & 1" cleco clamps shown in riveting group. The 1" cleco clamps are more useful than the small ones. 9/30/99.
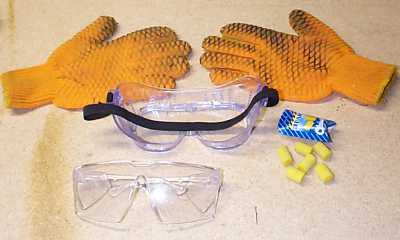
The SAFETY group. Gloves for raw cut parts with rubber grip coating, goggles for using table router, glasses for all cutting & drilling, ear plugs. 9/30/99.
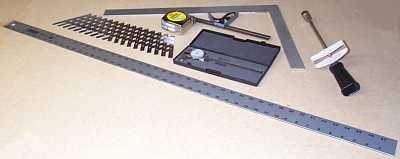
The MEASURE group. Carpenter's square, 48" straight edge, rivet spacer, tape measure, 12" combination square, micrometer, bar-type torque wrench. 9/30/99.
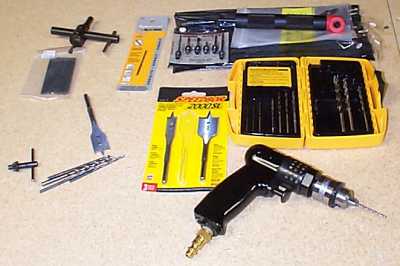
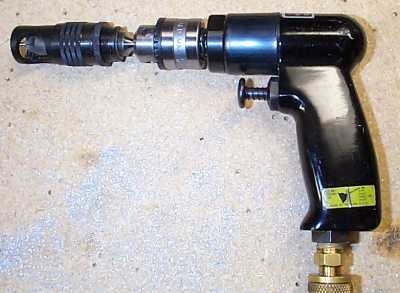
The DRILL group. Fly (circular hole) cutter, 3/32" 135deg. split-point drill (need a LOT of these for all of the pilot holes - piloting 3/32" then reaming to #30 is a lot easier than just going to #30 directly), angle drill kit with threaded stub drills from McMaster-Carr, drill chuck, 135deg split point drills, wood boring drill bit for 3/4" holes (may try on 1" holes as well - works well in sheet stock), split point drill set, Jacobs 1/4" air drill. Next to the big power tools (router, drill press, belt-disc sander, band saw), I spent the most on the air drill. It is light, fast, and by far the most-used tool in riveted sheetmetal airplane construction. 9/30/99.
The main change I made for the S/N 815 build was to add two each of #30 and #40 12" long drill bits. These flex to get into tight places, and have essentially replaced the right angle drill kit (and its expensive threaded drill bits). I have only used that right angle attachment once so far, and there was probably another way to get those few holes drilled (the tailwheel mount weldment). 12/29/06.

The DEBUR group. One of my favorites. Small rat-tail file, small flat file. Larger flat file, larger rat-tail file. Ryobi motor-tool with grinding bit (can't use the stone-based grinders - they load up on aluminum instantly). Inside-hole debur (the red handle) for 1", 3" & 4" i.d. holes. Small-hole debur (the blue handle) and extension for across-the-rib holes. 2-sided dual-wheel debur (red handle with hand guard). This thing is SHARP. The wheels do not turn when deburring, but can be loosened and rotated if the edge gets dull. Does both sides of a sheet edge at the same time. Used for longer edges. 9/30/99.
The microstop countersink. Goes on the end of the drill, and the adjustable depth guard allows the countersink depth to be changed in .001" increments. 10/31/99
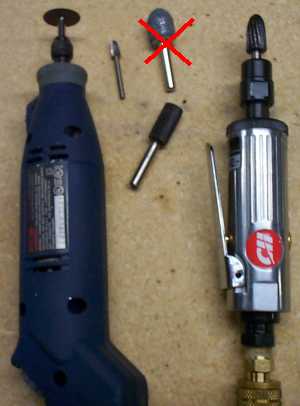
Grinding tools. Electric grinder on left with cutoff wheel used for grinding slots. Grinder with "x" is stone-based. These load up on aluminum instantly and are useless. Other grinders shown are grooved metal - they load up too, but can be unloaded by scraping out the grooves. The two 1/4" shaft tools (for the air grinder) are by Vermont American (from a hardware store ~$2 each). 10/31/99
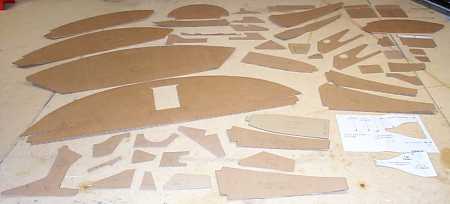
The cardboard Sonex. Many parts are first made of cardboard then traced onto the metal. Some of these are used only to locate hole patterns on parts simple enough to be laid out by measuring. I'm using thinner corrugated cardboard that many of the tools were originally packed in. There is glossy color printed on the back side - this kind of cardboard is easier to cut than shipping boxes and allows hole locations to be pressed through to the metal with the automatic center punch. 1/17/00
Dimpling & riveting tool from Avery. Nice finish; very sturdy construction. ~$130 for the tool, ~$28 for the pair of spring back dimple dies. For another $3.75 (from ATS), I'll get a squeezer cup (p/n 4706?) that can be used for the wing spar solid rivets. The riveting tool comes with 2 other shafts - one to offset the die off the bottom of the c-frame (if necessary due to part geometry), and another hammer-shaft for use with a rivet gun. I may try this combo for the wing spar - the c-frame for good controlled alignment with the rivet gun for low-effort hammering. If the rivet gun is too difficult to control, add an ATS p/n 4710 ($3.75) to the manual hammer shaft for "hand" rivet setting. 12/1/99
Why I thought the dimpling tool was necessary. 3 dimples on the upper left were done by a hand-puller based $5 tool. Some have reported reasonable results with these, but I had used an Avery-style tool before, and knew dimples could be more tightly formed. 12/1/99
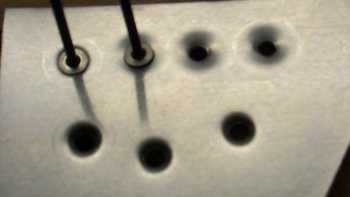
Shows how the c-sunk rivets fit into the dimples. Dimple on left from Avery tool. Nice fit, exactly flush. Dimple on right from hand-puller tool - in .032 6061 material. Sloppy fit, wobbly rivet. The other side of the "crater" formed from the hand-puller will not fit into the machined c-sinks (a lot of the structures dimple the thin material & countersink the lower, thicker material below). The lower row of dimples are also off the Avery - the holes appear to be stretched quite oversize, but it is just the shadow. As others have pointed out, it is helpful to use a .125 drill instead of #30 so the hole stretching results in a minimally oversize hole. 12/1/99

After receiving the samples from Nuvite, (800)394-8351, I could not resist trying them out. This is after 2 buffings with F7 grade, then 3 more with S grade. The polish works very well with very little on the surface. I was using terrycloth pads on an automotive orbital waxer, moving very slowly, and removing the polish with an old soft cotton shirt. The Nuvite rep at Sun-N-Fun would apply the polish by putting a little on his finger, then dabbing spots on the surface 3-4" apart. It seems like too little, but it works. 6/8/00
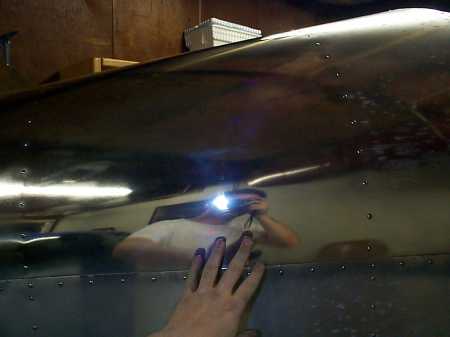
Another view. 6/8/00
Stupid rivet spacer trick. Do not try this at home. Took me quite a while to bring it back to normal. Then Dave pointed out that when the endpoints of the equally spaced holes are too far apart, just divide the interval in half and put the spacer across half the gap. Too obvious for me, I'd rather buy a bigger spacer. 9/15/99.
I am impressed with how few tools this project has required. Though not many tools are required, almost all are sheetmetal-aircraft-specific.
*This web site is NOT owned or managed by Sonex, Ltd.. Sonex, Ltd. is not responsible for the content unless explicitly stated. See Disclaimer.
Since you are looking at Sonex stuff, and maybe thinking about an airplane, this is how I explained it to a friend the other day - composite may make neat shapes, but my research found that composite airframes can easily become as much as 20% overweight. I also feel that as a first-time constructor, I can obtain much, much more predictable strength and weight with metal. Composite can end up significantly weaker than the design calls for if it is not laid up properly. Plus the chemicals, odors, and dust I don't find too attractive.
I spoke with a tube and fabric builder and his take on it is that the riveted sheetmetal approach also adds to the satisfaction of building in that parts are completed more quickly. He spent a long, long time working on a bare pile of tubes that didn't look like an airplane until many, many hours were into the project. Then, when the fabric work progressed, even that took many, many hours of finishing to make a completed part.
On the blind rivets - this makes attaching parts together go very quickly. They are aircraft-grade, and are stronger than the equivalent size aluminum bucked rivets. I have heard that there is at least one Sonex builder who is bucking the whole thing, but for a first-time builder, blinds are an easy way to go. (IIRC, Sonex was designed to the lower strength of solid bucked rivets, but check with them if you are considering a change from the rivets called out in the plans. The blind "pop" rivets used on Sonex are NOT from the hardware store.)
I also looked very closely at Murphy's line of larger, all-blind-rivet aircraft. After working on the Sonex for a while, I would expect their planes to go together very quickly with mostly preformed parts which already are pilot drilled. That gets me to the fun of clecoeing, drilling, & riveting right away...